如何定制wordpress控制面板
Posted on | 3 1 月, 2011 | 1 Comment
WordPress is one of the best CMSs out there — if not the best (but of course, I’m biased because I’m a WordPress fanatic). It has loads of handy features that make site administration a breeze. WordPress is a publishing platform with a comment system, a GUI for creating, editing and managing posts and pages, handy built-in tools like the “Export” feature to back up your content, user roles and permissions, and more.
But how much of these features do we really use? Though already simple and user-friendly by default, we might want to customize the WordPress Admin interface to make it even simpler and more manageable for our clients, our co-authors, and ourselves.
Why Customize the WordPress Admin Interface?
Lately, WordPress has reached phenomenally high usage rates. There are over 25 million publishers[1] who use WordPress, making it a popular publishing platform. This means that its use has been extended outside of just a blogging platform (although it was certainly built for bloggers at the start) to other types of sites such as portfolios, business sites, image galleries, and even e-commerce sites.
Here is the problem, though. A robust publishing platform like WordPress has way more features than a regular user would ever need. Take the “Comments” panel for instance: Not everyone is going to need all the moderation privileges it has. Some sites might not even need commenting capabilities on their content. For example, a static informational site that doesn’t have a blog section might not want people to be able to comment on static pages like their About and Contact Us page.
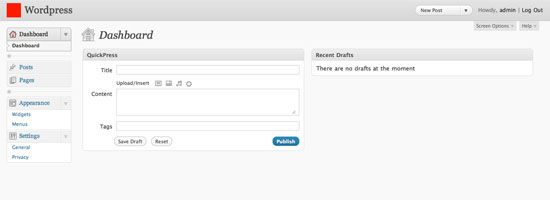
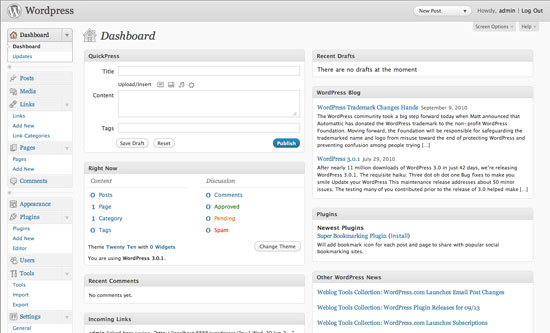
The following image shows the default WordPress Dashboard — the first page you’ll see when you log into the Admin area. For tech-savvy folks and power users, it’s great. But imagine a person (such as a paying client of yours) who doesn’t need half of the things they see in this screen. All they want to do is publish a post. Maybe edit it if they make a mistake. That’s it. Nothing else.
The Solution
Luckily, WordPress has a solution. A good one. A completely modular and reversible one, in case you want to quickly revert back to the way things were.
The solution is called Hooks, also known as “Filters” and “Actions”. These guys allow us to “hook” into the WordPress core without modifying its files so that we can safely make changes without compromising the integrity of our installation.
We are going to use WordPress’s different actions and some of the available filters to remove features we do not need. We will also make some basic customization changes to brand our WordPress Admin area for our clients.
The snippets we will be using are mostly from my site, WP Snippets, a searchable repository of WordPress snippets (check it out when you have the time).
WordPress’s functions.php
Let’s get started. The first thing you need to do is open up functions.php in your theme’s directory. If you don’t have a functions.php file, then just create one using your favorite text editor.
functions.php is the file where we will put all our code in. WordPress automatically checks this file, allowing you to customize just about everything before it’s rendered on the screen.
Sounds fuzzy? Here’s how it works. Try out the following code. Don’t worry; it will only affect the Admin area — so your site visitors won’t see it. However, I do want to advise you to experiment offline by installing WordPress on your computer (it’s easier than you think).
<php
function testing() {
  echo 'Hello World!';
}

add_action( 'admin_head', 'testing' );
?>

Explanation
The code should print ‘Hello World!’ inside the <head> tags in the Admin panel, which isn’t valid HTML code and therefore is printed out at the top of the web page.
The testing() function is our code that we want to run. To hook into WordPress core, we use the add_action() function. In this situation, we pass in two parameters. The first parameter is the name of the action you want to hook into ('admin_head'). The second parameter is the name of the function you want to run ('testing').
After you try this code snippet out, be sure to remove this code from your functions.php file (we’re done with it).
Disable Dashboard Widgets
The first thing people will see when logging into the Admin area is the Dashboard. There, you’ll find widgets like “WordPress Blog,” “Other WordPress News,” and “Incoming Links”. Not very interesting for the average user.
We will be using the wp_dashboard_setup action to remove them. In the function we want to execute, we will use the unset() function to remove the Dashboard widgets we don’t want to display. Then all we need to do is call add_action() using 'wp_dashboard_setup' as the first parameter as well as our function, named remove_dashboard_widgets, as the second parameter.
function remove_dashboard_widgets(){
  global$wp_meta_boxes;
  unset($wp_meta_boxes['dashboard']['normal']['core']['dashboard_plugins']);
  unset($wp_meta_boxes['dashboard']['normal']['core']['dashboard_recent_comments']);
  unset($wp_meta_boxes['dashboard']['side']['core']['dashboard_primary']);
  unset($wp_meta_boxes['dashboard']['normal']['core']['dashboard_incoming_links']);
  unset($wp_meta_boxes['dashboard']['normal']['core']['dashboard_right_now']);
  unset($wp_meta_boxes['dashboard']['side']['core']['dashboard_secondary']);
}

add_action('wp_dashboard_setup', 'remove_dashboard_widgets');
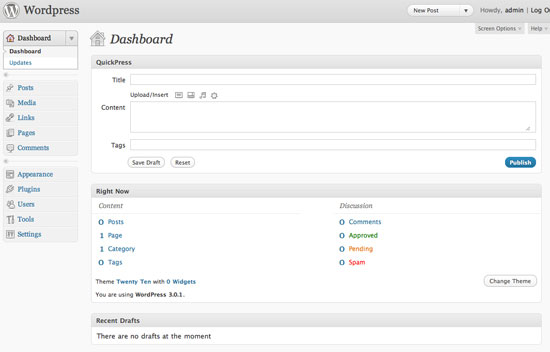
Check out the WordPress docs entry on removing dashboard widgets for more information.
Disable Standard Widgets
WordPress comes with 12 standard widgets. Some of these default widgets include Calender (WP_Widget_Calendar), Search (WP_Widget_Search) and Recent Comments (WP_Widget_Recent_Comments).
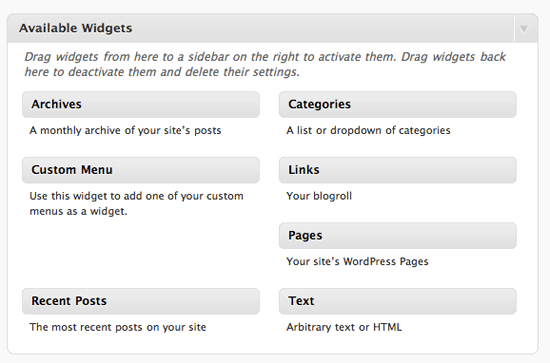
You might want to disable the widgets that aren’t needed for your WordPress installation, again, to simplify and declutter your publishing platform. For example, you might not need the calendar, or maybe you’ve used a third-party search service such as Google Custom Search for your client’s WordPress installation.
For this one, we will be using widgets_init action. We will name our function simply as remove_some_wp_widgets. In our function, we will use WordPress’s unregister_widget() function using the names of the widgets we don’t want to use as the parameter.
Then, like before, we just call add_action. What you’ll see in this code snippet is a third parameter ('1'). The third parameter is the priority of the action. 10 is the default priority, meaning that if you don’t pass a value for this optional parameter, it will assume the value is 10. The lower the number, the higher the priority. So at 1, this is one of the top priority functions that will be called first no matter what its position is in functions.php.
function remove_some_wp_widgets(){
  unregister_widget('WP_Widget_Calendar');
  unregister_widget('WP_Widget_Search');
  unregister_widget('WP_Widget_Recent_Comments');
}

add_action('widgets_init',remove_some_wp_widgets', 1);
Learn more about the Widgets API to see other cool stuff you can do with it.
Removing Menu Items
You might want to remove menu items in the Admin panel to simplify the interface.
This is how you disable top-level menu items such as “Posts,” “Media,” “Appearance,” and “Tools”:
function remove_menu_items() {
  global $menu;
  $restricted = array(__('Links'), __('Comments'), __('Media'),
  __('Plugins'), __('Tools'), __('Users'));
  end ($menu);
  while (prev($menu)){
    $value = explode(' ',$menu[key($menu)][0]);
    if(in_array($value[0] != NULL?$value[0]:"" , $restricted)){
      unset($menu[key($menu)]);}
    }
  }

add_action('admin_menu', 'remove_menu_items');
This is how you would remove submenu items under the top-level navigation (for example, the “Theme” link under “Appearance”):
function remove_submenus() {
  global $submenu;
  unset($submenu['index.php'][10]); // Removes 'Updates'.
  unset($submenu['themes.php'][5]); // Removes 'Themes'.
  unset($submenu['options-general.php'][15]); // Removes 'Writing'.
  unset($submenu['options-general.php'][25]); // Removes 'Discussion'.
  unset($submenu['edit.php'][16]); // Removes 'Tags'.
}

add_action('admin_menu', 'remove_submenus');
To find what the submenu names are, just go to wp-admin/menu.php and search for the item you want to disable.
Remove the Editor Submenu Item
The Editor link (a submenu item under “Appearance”) is a bit tricky to disable. It doesn’t respond to the unset() function used above. Thus, if we wanted to remove it from the menu, we’d have to remove the action that displays it.
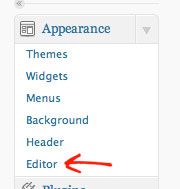
We will use the remove_action() function which simply removes the action from our theme.
function remove_editor_menu() {
  remove_action('admin_menu', '_add_themes_utility_last', 101);
}

add_action('_admin_menu', 'remove_editor_menu', 1);
Disable Meta Boxes in the Editing Pages
The “Add New” and “Edit” pages — the GUI for creating and editing posts and pages — is probably the most used feature in the Admin area. This is what you and/or your clients will be most exposed to. It serves us well if we try to clean these pages up by removing things that we do not need.
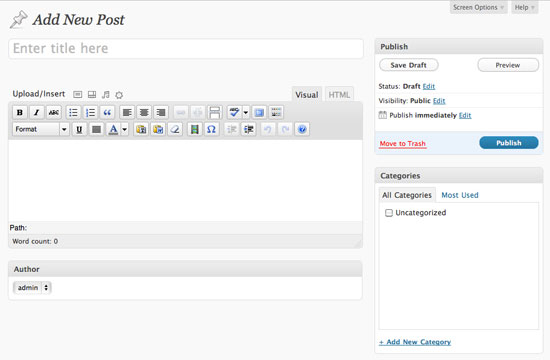
For example, do you use any Custom fields or do you use the Excerpts field? If not, just remove them from this view.
The following code snippet uses the remove_meta_box() function. The first parameter is the meta box’s HTML ID attribute you want to remove.
To find out the ID, just inspect the source code or use a tool like the Web Developer Toolbar to determine the ID attribute value of the section’s containing <div>. For example, the Custom Fields’ ID is #postcustom, so the parameter we use is 'postcustom'.

The second parameter refers to the page you want to remove the meta box from (it can be either 'post', 'page', or 'link').
We are going to remove the custom field, Trackbacks checkbox (because most of the time, we either enable or disable it in all of our posts), the comments status option, tags (if you don’t tag your posts with keywords, why have this input field?), and so on.
function customize_meta_boxes() {
  /* Removes meta boxes from Posts */
  remove_meta_box('postcustom','post','normal');
  remove_meta_box('trackbacksdiv','post','normal');
  remove_meta_box('commentstatusdiv','post','normal');
  remove_meta_box('commentsdiv','post','normal');
  remove_meta_box('tagsdiv-post_tag','post','normal');
  remove_meta_box('postexcerpt','post','normal');
  /* Removes meta boxes from pages */
  remove_meta_box('postcustom','page','normal');
  remove_meta_box('trackbacksdiv','page','normal');
  remove_meta_box('commentstatusdiv','page','normal');
  remove_meta_box('commentsdiv','page','normal');
}

add_action('admin_init','customize_meta_boxes');
Remove Items from the Post and Page Columns
WordPress’s Admin area often has tables that give you a quick overview of a listing of your content. If you wanted to remove columns from these views, you can.
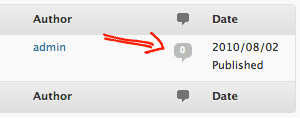
This time, we will use the add_filter() WordPress function to add a filter instead of an action. A filter is simply a function that watches out for data being called from the database. When it sees something that we want to remove (or modify), it executes the filter first before rendering the data on the web page.
In the example below, we will remove the comments count from the Edit Pages and Edit Posts pages.
function custom_post_columns($defaults) {
  unset($defaults['comments']);
  return $defaults;
}

add_filter('manage_posts_columns', 'custom_post_columns');

function custom_pages_columns($defaults) {
  unset($defaults['comments']);
  return $defaults;
}

add_filter('manage_pages_columns', 'custom_pages_columns');
Customize the Favorites Dropdown
Sitting at the top bar of the Admin area is a dropdown called “favorites” that just lists commonly used Admin tasks such as “New Post,” “Comments” (which takes you to the comment moderation page), and so on — for easy access.
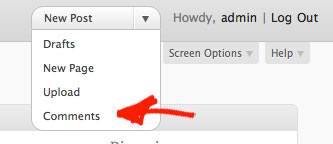
If we wanted to remove items in this menu, we can easily do so. (Of course, we can also add stuff here too.) We can do this by adding another filter and unsetting the link, which is contained in a PHP array called $actions.
function custom_favorite_actions($actions) {
  unset($actions['edit-comments.php']);
  return $actions;
}

add_filter('favorite_actions', 'custom_favorite_actions');
The Final Stretch: Miscellaneous Modifications
Everything we have done so far is to disable stuff we don’t need. Now we’ll modify a few things.
Customize the Footer
The footer text in WordPress Admin contains links to the Documentation and to WordPress. Let’s change that.
This snippet just prints out some footer text.
function modify_footer_admin () {
  echo 'Created by <a href="http://example.com">Filip</a>.';
  echo 'Powered by<a href="http://WordPress.org">WordPress</a>.';
}

add_filter('admin_footer_text', 'modify_footer_admin');

Change the Logo
This one’s an old trick, but a good one nonetheless. You can change the logo for the login page and the one in the top left located at the WordPress Admin area pages.
The subsequent code snippet just prints out the CSS (that will be printed inside the <head> tags of Admin pages) that hooks into the div of the logo; it has an ID of #header-logo in the admin pages and it is the h1 > a element for the login page.
For the url property of the style rules, we just feed it the image location of our logo. If the image is inside your WordPress theme’s directory, you can simply use the get_bloginfo('template_directory') template tag to get the relative path to it, followed by the location of the images directory (in this case, it’s called “images”) and then the file name of your image (in this case, admin_logo.png and login_logo.png).
function custom_logo() {
  echo '<style type="text/css">
    #header-logo { background-image: url('.get_bloginfo('template_directory').'/images/admin_logo.png) !important; }
    </style>';
}

add_action('admin_head', 'custom_logo');

function custom_login_logo() {
  echo '<style type="text/css">
    h1 a { background-image:url('.get_bloginfo('template_directory').'/images/login_logo.png) !important; }
    </style>';
}

add_action('login_head', 'custom_login_logo');
Hide the Upgrade Notice to Recent Versions
There’s no guarantee that your theme will support the next version of WordPress, so to prevent your clients from updating their website, you can ask WordPress to hide this notification.
First, I have to say that this isn’t advisable. WordPress core developers put this notification there for a huge reason: Security updates. But if you must remove it (or modify it), all you have to do is to add a filter for it.
add_filter( 'pre_site_transient_update_core', create_function( '$a', "return null;" ) );
Customize the WYSIWYG Editor’s CSS
If you wanted to customize the appearance of the WYSIWYG editor (maybe to match the theme of your site), you can create a custom stylesheet for it (you can call it something like editor-style.css) and then study the HTML markup to see how you can hook into the classes and IDs of the editor. Then to add your custom stylesheet, you can use the add_editor_style() function.
add_editor_style('css/editor-style.css');
The reason why you’d want to do this instead of modifying the global.css stylesheet that comes with WordPress is ease of updating the core and modularity. If there’s one major theme to take away in this guide, it’s that you should never modify WordPress core files — there are plenty of ways to hook into them.
The Outcome
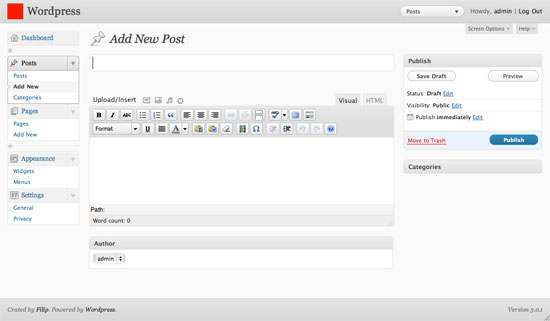
Using these snippets of code, you can customize and reduce the Admin area’s features down to just the essentials, permitting us to benefit from the advantages of minimalism and reductionism principles in our work.
This is what I’ve been doing, and my clients love that all the clutter that they don’t need isn’t there.
Here’s a final image of my result (for the “Add New Post” page):
Your Turn
Now it’s your turn to talk. Do you customize WordPress in any way for your customers, and if so, how? The depth of WordPress is incredible, and I would love to see more tips and tricks about how to make it even simpler — share your tips and tricks in the comments.
英文版原文:
http://sixrevisions.com/wordpress/how-to-customize-the-wordpress-admin-area/
中文版:
http://www.zhaokunyao.com/archives/1257
Post video players, slideshow albums, photo galleries and music / podcast playlist
Posted on | 2 1 月, 2011 | No Comments
正想找几款wordpress插件,解决
1. 视频上传的问题
2.想实现类似 http://sports.qq.com/a/20101226/000488.htm#p=1
或 这样 http://sports.163.com/10/1226/17/6ORJAQL100051C8V.html#p=6ORIGEBR00DE0005 的文章多图浏览效果
今看到wp上推荐了这款听起来能解决很多问题的插件,好像不错 试用看看
One professional plugin for all your multi-media needs – Free Visit Site >> :
*  Add Image galleries
*  Add Slideshows and photo albums
*  Add Video
*  Add Music playlists
*  Add Podcast and mp3
*  Add Menus and much more
*  Media Library
- 44 skins and more – slideshow, video players, playlists, flash, full-screen, Cooliris, lightbox and wedding skins etc
- Automatic uploading and hosting
- Automatic resizing of photos
- Automatic video transcoding to flv/3gp/mp4
- Complete analytics of your traffic
- Support iPhone, iPad, blackberry automatically and other smart and mobile phones
- Hosting and delivering your media on Amazon S3 Web Services ensure scalability and reliability.
- Video hosting, video serving, video streaming and pseudo streaming (progressive download) solutions
- Managment of the galleries is simple and straight forward
- Many types of players to choose from including JW, flowplay, Cooliris and others
- Many customization options, sizes, colors, text etc
- Support playlist with customizable side, bottom and top list using CSS
- Add caption and description to any item
- Integrates with your CDN solution
- Managment tool to allow your users/designers/web master to upload videos
- Embed code button directly into article
- Progressive Download (Pseudo streaming – httpd)
- HD widescreen flv and H.264, ideal for videoblog and photoblog
- Supported file types – avi, mov, wmv, mp4, m4a, f4a, f4b, f4v, f4p, m2ts, mts, DVD vob, mkv, rmvb, m1v, qt, div, divx, dv, 3gp, 3gpp, 3g2, mpg, mpeg, mpe, flv, wav, wma
- Preview image in 4 sizes (for first frame of video).
- Full Screen feature.
- Domain lock feature to protect your video
- Download source feature
- On screen Logo for branding
- Google analytics Tracking Enabled
- Support other CMS systems and public web sites
- Post to your blog from anywhere and even if your videos are at home on your PC
- The plugin is FREE, we do offer a pro account with even more options.
Cincopa Content Gallery creates an automated, fully customizable image gallery, slideshows, video and music playlists anywhere within your WordPress site. Choose your videos, images and music and display skin, pages or posts with custom overlay text and a rotating thumbnail belts.
Now with new video players and slideshows!
Get more information about Cincopa WordPress Plugin and see some examples.
For comments, questions and support use this email oren.wp.plugin@cincopa.com
Buddypress and wpmu
Ideal multimedia solution for buddypress and mu because each user gets his own private storage space with zero cost to site owner.
 orenshmu
http://wordpress.org/extend/plugins/cincopa-video-slideshow-photo-gallery-podcast-plugin/
wordpress有没有目录折叠插件?
Posted on | 1 1 月, 2011 | No Comments
插件的作用是实现 :
添加文章页面的分类目录树,可以折叠和展开
因为当分类太多时,很难找到呀要选择的分类
有没有已实现这个功能的插件呢?
Helicon Ape
Posted on | 1 1 月, 2011 | No Comments
ISAPI_Rewrite 3 可以让IIS实现URL重写功能,但如果你的服务器用的是IIS7+,则使用以下介绍的Ape 会更好些
Overview
Helicon Ape provides support for Apache .htacces and .htpasswd configuration files in Microsoft IIS. It literally implements Apache configuration model and all most demanded Apache modules in a single IIS add-on, not only making IIS compatible with Apache, but also extending it’s functionality by a number of highly essential features.
Includes following modules: mod_rewrite, mod_proxy, mod_auth, mod_gzip, mod_headers, mod_cache, mod_expires, mod_replace and others. You can check all currently available modules in the compatibility chart (the list is growing with new builds).
Helicon Ape offers
Compatibility
- modification-free transition of Apache web sites to IIS (.htaccess, .htpasswd, etc.);
- easy configuration of PHP and other Unix-based Web applications for IIS;
- powerful, fully Apache-compatible URL rewriting syntax — no rules redesign is necessary.
Usability
- user-friendly manager — configuration editing, syntax highlighting, help, testing utility in one place;
- plain text configurations — no XML;
- per-site installation without hosting administration participation;
- on-the-fly links, headers and HTML body modification.
Security
- customizable user authentication/authorization settings;
- comprehensive protection from DoS attacks and hotlinking (content leeching);
- all-round web request debugging with HTTP-level web developer toolset.
Performance
- full-fledged reverse and forward proxy functionality;
- drastic server speed-up due to finely adjustable compression and cache functions.
Helicon Ape is implemented as managed IIS7 module, but can be installed as .NET module on any ASP.NET-compatible IIS version as well. It works transparently for both server and client and can even be installed on a shared hosting account without administrative access.
And there is free version of Ape which can be installed on up to 3 web sites on any server at no cost.
Currently implemented modules
| Module | empowers you to… |
|---|---|
| mod_asis | send files that contain their own HTTP headers |
| mod_auth_basic | use HTTP Basic Authentication |
| mod_auth_digest | use MD5 Digest Authentication |
| mod_authn_anon | configure anonymous users access to authenticated areas |
| mod_authn_dbd | provide authentication based on user look-up in SQL database |
| mod_authn_default | reject whatever credentials if no authentication is set |
| mod_authn_file | provide authentication based on user look-up in plain text password file |
| mod_authz_default | reject any authorization request if no authentication is configured |
| mod_authz_groupfile | allow or deny access to particular areas of the site depending on user group membership |
| mod_authz_host | allow access control to particular parts of web server based on hostname, IP address or other characteristics of the client request |
| mod_authz_user | allow or deny access to portions of the web site for authenticated users |
| mod_cache | cache local or proxied content |
| mod_core | use Helicon Ape core features |
| mod_dbd | manage SQL database connections |
| mod_deflate | compress server output |
| mod_developer NEW! | debug web requests |
| mod_disk_cache | use disk-based storage engine for mod_cache |
| mod_env | control the environment provided to CGI scripts and SSI pages |
| mod_evasive | protect your site(s) from HTTP DoS/DDoS attacks and brute force attacks |
| mod_expires | set Expires HTTP header and max-age directive of Cache-Control HTTP header in server responses in relation to either the time the source file was last modified, or to the time of the client access |
| mod_filter | use context-sensitive content filters |
| mod_gzip | compress HTTP responses |
| mod_headers | modify HTTP request and response headers |
| mod_hotlink | protect the content from hotlinking |
| mod_linkfreeze | change links on pages to SEO-friendly format |
| mod_log_config | use custom logging |
| mod_logio | log input and output number of bytes received/sent per request |
| mod_mem_cache | use memory-based storage engine for mod_cache |
| mod_mime | associate requested filename’s extensions with the file’s behavior (handlers and filters) and content (mime-type, language, character set and encoding) |
| mod_proxy | apply forward and reverse proxy functions for your IIS server |
| mod_replace | edit HTML body, HTTP request and response headers |
| mod_rewrite | rewrite requested URLs on the fly based on regular-expressions-based rules and various conditions |
| mod_seo NEW! | create SEO-friendly links on pages based on database or mapfile values |
| mod_setenvif | set environment variables depending on whether different parts of the request match specified regular expressions |
| mod_so | emulate loading modules functions |
| mod_speling | correct misspelled URLs by performing case-insensitive checks and allowing one misspelling |
| mod_usertrack | track and log user activity on the site using cookies |
| mod_xsendfile NEW! | sends the file specified by X-SENDFILE header |
文章来源: http://www.helicontech.com/ape/
ISAPI_Rewrite 3
Posted on | 1 1 月, 2011 | 1 Comment
《在Windows IIS下配置WordPress MU环境》文章中提到的 ISAPI_Rewrite 3,以下是它的一些相关介绍
ISAPI_Rewrite 3 – Apache .htaccess mod_rewrite compatible module for IIS
ISAPI_Rewrite is a powerful regular-expressions-based URL rewriter for IIS. It is compatible with Apache mod_rewrite making it possible to move configurations from Apache to IIS and vice versa just by copying .htaccess files (please see this compatibility chart). It is used for search engine optimization, to proxy another server’s content, stop hotlinking or strengthen server security.
Top features of ISAPI_Rewrite:
- The same syntax and behavior as of Apache mod_rewrite make it possible to migrate configurations just by copying .htaccess files. Read more about mod_rewrite compatibility here.
- Regular expressions for flexible and powerful configurations.
- Extremely fast and highly scalable pure C++ code.
- Real distributed configurations: global server level, virtual host (web site) level, directory level .htaccess files with real-time monitoring.
- Isolation – user level configuration affects only local user environment making ISAPI_Rewrite an ideal solution for web hosting providers.
Top usage examples:
- Search engine optimization. Read more.
- Proxying content of one web server through another web server. Read more.
- Prevention of content leeching (direct linking). See example.
- Blocking specific hosts, referrers or annoying robots.
- Content negotiation – serving different files for different language or different browsers. See example.
- Load balancing emulation for web cluster. See example.
Please find more useful examples in ISAPI_Rewrite documentation here and in Apache documentation here http://httpd.apache.org/docs/2.2/misc/rewriteguide.html Most Apache examples can run with ISAPI_Rewrite without modification.
Pricing details
- Free 45-day trial period.
- Single server (computer) license – $99.
- ISAPI_Rewrite Lite version is Freeware! (Read on specific limitations).
- Volume discounts available!
Click here to get older versions of ISAPI_Rewrite.
Windows Vista and the Windows Vista Start button are trademarks or registered trademarks of Microsoft Corporation in the United States and/or other countries.
文章来源:http://www.helicontech.com/isapi_rewrite/
在Windows IIS下配置WordPress MU环境
Posted on | 1 1 月, 2011 | No Comments
昨天介绍的Windows Server 2003下的IIS和Apache性能比较,其实Apache在Linux环境下的性能还是很不错的,我之所以使用Windows Server 2003而没有用Linux,是因为我对Linux的维护并不熟悉,因此才使用Windows环境。
在Windows环境下使用IIS搭建和Linux的Apache一样的环境也并非不可能,下面我就介绍一下我使用Windows Server 2003的IIS搭建一个和Apache一样的WordPress MU(WordPress多用户版)的过程。
首先要安装PHP和MySQL环境,为了方便安装,可以直接安装一个WAMP的集成安装环境,可以直接将Apache、MySQL和PHP安装好,将其安装为服务后,禁用Apache的服务,以免其和IIS冲突。
接着是在Windows Server 2003下配置PHP,配置方法是,在IIS的“WEB服务扩展”中,添加一个新的WEB服务扩展,程序后缀为PHP,ISAPI程序为 php5isapi.dll,然后再“环境变量”-“系统变量”中增加变量名PHPRC,数值为php.ini的路径,重启服务器即可完成PHP的配置。
接下来安装WordPress MU环境,安装过程和Apache环境下安装一样。
最后,最重要的一步就是设置URL重写(URL rewriter),目前我使用的是一个名为ISAPI_Rewrite 3的ISAPI实现的这个功能,3.0版本ISAPI_Rewrite兼容Apache的mod_rewrite格式,可以直接将.htaccess文件内容复制到httpd.conf中,可惜这个软件的免费版减少了很多有用的功能,多站点设置有点复杂。
ISAPI_Rewrite对于Apache的mod_rewrite并不是完全兼容,还需要对WordPress进行一些修改,打开WordPress MU的wp-settings.php文件,在文件的最开头增加下面这一行:
$_SERVER[‘REQUEST_URI’] = $_SERVER[‘HTTP_X_ORIGINAL_URL’];
好了,现在WordPress MU即可在IIS下运行了,WordPress单用户版的配置也是同样道理,而且会更简单。
如何在IIS环境下配置Rewrite规则
Posted on | 1 1 月, 2011 | No Comments
URL 静态化可以提高搜索引擎抓取,开启本功能需要对 Web 服务器增加相应的 Rewrite 规则,且会轻微增加服务器负担。本教程讲解如何在 IIS 环境下配置各个产品的 Rewrite 规则。
一、首先下载 Rewrite.zip 的包,解压到任意盘上的任意目录。
各个产品的 Rewrite 规则包不同,请选择对应的产品下载对应的 Rewrite 规则。
Discuz!6.0.0/6.1.0 的 Rewrite 规则下载地址: Rewrite.zip
UCenter Home1.0.0 的 Rewrite规则下载地址:Rewrite.zip
SupeSite6.0_X-Space4.0_UC 的Rewrite 规则下载地址:iisrewrite.zip
SupeV 的 Rewrite 规则下载地址:rewrite_iis.zip
下载各个产品的 Rewrite 规则并且重命名后如下图所示存放:

二、配置方法
Discuz!、UCHome、SupeSite/X-Space、SupeV 的 Rewrite 配置方法类似,下面以 Discuz!6.0.0/6.1.0 的 Rewrite 规则配置方法为例讲解如何在 IIS 环境下配置 Rewrite 规则。
在 IIS 管理器里选择网站,右键选择“属性”,如下图所示:

在弹出的窗口里选择“ISAPI筛选器”

上图中点击“添加”,在弹出的窗口里“筛选器名称”填写“rewrite”

上图界面中点击“浏览”,选择下载解压后的 Discuz! Rewrite 规则目录下的 Rewrite.dll 文件

浏览完毕点击“确定”

添加完毕点击“确定”

重新启动 IIS


重新选择该站点 => 右键“属性”=> “ISAPI 筛选器”,如果看到状态为向上的绿色箭头,就说明 Rewrite 模块安装成功了。

Rewrite 规则配置成功了,但是这个时候浏览论坛地址依旧不是伪静态的,还需要到论坛后台做相应的设置才可以。
论坛后台 => 全局 => 优化设置,下图中红色区域选项:

“URL 静态化”:如上图所示有五个选项,根据您的需求选择即可,最多可以选择五个,不选则不生效。
“Rewrtie 兼容性”:如果您的服务器不支持 Rewrite 规则中的中文字符,请选择“是”。对于没有此问题的服务器,可以选择“否”。
上面两项设置完毕“提交”保存即可。
这个时候返回到论坛首页随便打开一个版块或者一个帖子即可看到 Discuz! 的 Rewrite 伪静态配置成功!


三、各个产品的 Rewrite 规则
httpd.ini 文件内容如下配置
[ISAPI_Rewrite]
# 3600 = 1 hour
CacheClockRate 3600
RepeatLimit 32
# Discuz! Rewrite规则
# 独立主机用户
# Protect httpd.ini and httpd.parse.errors files
# from accessing through HTTP
RewriteRule ^(.*)/archiver/((fid|tid)-[\w\-]+\.html)\?*(.*)$ $1/archiver/index\.php\?$2&$4
RewriteRule ^(.*)/forum-([0-9]+)-([0-9]+)\.html\?*(.*)$ $1/forumdisplay\.php\?fid=$2&page=$3&$4
RewriteRule ^(.*)/thread-([0-9]+)-([0-9]+)-([0-9]+)\.html\?*(.*)$ $1/viewthread\.php\?tid=$2&extra=page\%3D$4&page=$3&$4
RewriteRule ^(.*)/space-(username|uid)-(.+)\.html\?*(.*)$ $1/space\.php\?$2=$3&$4
RewriteRule ^(.*)/tag-(.+)\.html\?*(.*)$ $1/tag\.php\?name=$2&$3

# SupeSite Rewrite规则
# 独立主机用户
# 修改以下语句中的 /supesite 修改为你的SupeSite目录地址,如果程序放在根目录中,请将 /supesite 修改为 /
RewriteRule ^/supesite/([0-9]+)$ /supesite/index\.php\?uid/$1 [L]
RewriteRule ^/supesite/([0-9]+)/spacelist(.+)$ /supesite/index\.php\?uid/$1/action/spacelist/type$2 [L]
RewriteRule ^/supesite/([0-9]+)/viewspace(.+)$ /supesite/index\.php\?uid/$1/action/viewspace/itemid$2 [L]
RewriteRule ^/supesite/([0-9]+)/viewbbs(.+)$ /supesite/index\.php\?uid/$1/action/viewbbs/tid$2 [L]
RewriteRule ^/supesite/([0-9]+)/(.*)$ /supesite/index\.php\?uid/$1/$2 [L]
RewriteRule ^/supesite/action(.+)$ /supesite/index\.php\?action$1 [L]
RewriteRule ^/supesite/category(.+)$ /supesite/index\.php\?action/category/catid$1 [L]
RewriteRule ^/supesite/viewnews(.+)$ /supesite/index\.php\?action/viewnews/itemid$1 [L]
RewriteRule ^/supesite/viewthread(.+)$ /supesite/index\.php\?action/viewthread/tid$1 [L]
RewriteRule ^/supesite/mygroup(.+)$ /supesite/index\.php\?action/mygroup/gid$1 [L]

# UCHome Rewrite规则
# 独立主机用户
# 修改以下语句中的 /uchome 修改为你的uchome目录地址,如果程序放在根目录中,请将 /uchome 修改为 /
RewriteRule ^/uchome/(space|network)-(.+)\.html$ /uchome/$1\.php\?rewrite=$2 [L]
RewriteRule ^/uchome/(space|network)\.html$ /uchome/$1\.php [L]
RewriteRule ^/uchome/([0-9]+)$ /uchome/space\.php\?uid=$1 [L]

# SupeV Rewrite规则
# 独立主机用户
RewriteRule ^(.*)/ivideo(-tv-([0-9]+))?(-ti-([0-9]+))?(-tc-([0-9]+))?(-page-([0-9]+))?\.html$ $1/ivideo\.php\?tv=$3&ti=$5&tc=$7&page=$9
RewriteRule ^(.*)/ispecial(-tv-([0-9]+))?(-ti-([0-9]+))?(-tc-([0-9]+))?(-page-([0-9]+))?\.html$ $1/ispecial\.php\?tv=$3&ti=$5&tc=$7&page=$9
RewriteRule ^(.*)/icategory\.html$ $1/icategory\.php
RewriteRule ^(.*)/category-cid-([0-9]+)(-tag-([^-]*))?(-timelimit-([0-9]+))?(-orderlimit-([0-9]+))?(-page-([0-9]+))?\.html$ $1/category\.php\?cid=$2&tag=$4&timelimit=$6&orderlimit=$8&page=$10
RewriteRule ^(.*)/vspace-(mid|username)-(.+)\.html$ $1/vspace\.php\?$2=$3
RewriteRule ^(.*)/video-(vid|ivid)-(.+)\.html$ $1/video\.php\?$2=$3
RewriteRule ^(.*)/special-spid-([0-9]+)\.html$ $1/special\.php\?spid=$2

文章来源:http://faq.comsenz.com/viewnews-11
Hello world!
Posted on | 1 1 月, 2011 | 1 Comment
欢迎使用 WordPress。这是系统自动生成的演示文章。编辑或者删除它,开始您的博客!
